
Saunas have become increasingly popular in recent years, with many people seeking the benefits of this relaxing and rejuvenating experience. However, specifying a sauna as an architect or designer can be a complex process that requires careful consideration of several factors, including ventilation, electrical and mechanical requirements, cladding, bench design, and more.
In this post, we'll provide a step-by-step guide to specifying a sauna that meets all the necessary requirements for a safe, durable, and enjoyable experience. We'll also provide a checklist for designers and architects to follow when specifying a sauna.
Step-by-Step Guide to Specifying a Sauna
Step 1: Consider Building Regulations
In the US, sauna installation is an unregulated industry, which means that anyone can put wood on the walls and call it a sauna. However, it's recommended to follow Finnish building regulation specifications for a more durable, safer, and enjoyable experience. If you are having a tough time locating an installer give us a call, we handle most anywhere in the US.

Step 2: Consider Interface Areas
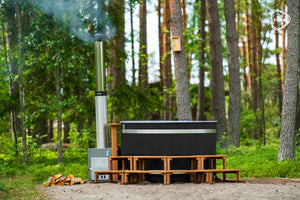
When specifying a sauna, it's crucial to consider the interface areas between the sauna and the rest of the space, as well as the mechanical and electrical requirements. The M&E requirements for most saunas include ventilation, electrics or flue if it's a wood-burning sauna, and drainage. There are also key interface areas such as the window and door.
Step 3: Choose Suitable Electrical Supply
The electrical supply for most US saunas will either be a UK single-phase 240V supply where you can specify up to a 9kW heater or European style 208V three-phase power supply. On three-phase sauna heaters, go up to about 33kW, which is for a large commercial sauna, but typical domestic saunas are going to be between 6 and 12kW.

Step 4: Consider Thermostat and Control Units Placement
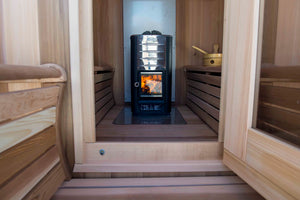
Sauna heaters have digital thermostats and control units, which need to be considered in terms of their location and where they are placed within the sauna. The thermostat will be specified by the heater manufacturer but is often located on the wall above the heater at about 100mm from the ceiling. Depending on the product, the controller can either be installed within the sauna, in the space adjacent, or in commercial applications in a plant room or safely secured behind an access panel. Not all heater controllers are suitable for inside the sauna, so you'll have to check that when you're specifying.
Step 5: Choose Suitable Ventilation Setup
Ventilation is crucial in sauna design, with most saunas requiring around 6 air turns per hour. A good sauna company will work with you to help specify the correct ventilation setup. However, in most cases, you'll require 1 points of air intake and 1 points of exhaust. The points of air intake could be a gap under the door and a vent low down behind the heater. One points of exhaust can include a vent at head height, often referred to as the dump vent or drying vent, which allows the sauna to dry off after usage as well as reduce any excess heat or humidity if required.
Step 6: Choose Suitable Flooring and Drainage System
We always suggest going for a tiled or porcelain tiled floor with a high anti-slip rating. In commercial applications, this should be as high as R13, though in domestic settings, the sauna will likely form part of a wet room environment, and therefore R11 or higher is acceptable. The drainage system in a sauna is also an important consideration. Having a drain in the sauna allows the area to be easily cleaned for the users to pour as much water as they want on the stones, and the sauna and it also allows the users to strip wash and clean themselves while they're in the sauna. Where a client is insistent on wanting wood on the floor, we would recommend specifying a duct board with tiles beneath because you can easily lift the board and clean the board as required and mop the floor beneath. If the customer does not plan on bathing within the sauna a drain is not recommended as it will off-gas once dried out.
If you'd like you can specify tile only for the flooring. Makes for a quick and easy maintenance routine. Don't have to go with anything fancy but remember you will see it!

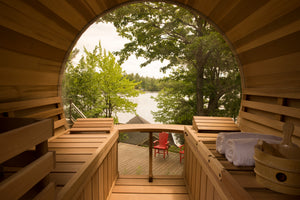
Step 7: Specify Suitable Windows and Doors
Windows and doors are important interface areas in sauna design. In most cases, sauna doors are specified as glass, but they can be specified in wood and wood glass combination. A key consideration is that full wooden doors pose a slight risk of walking into a gangway blind and causing a collision with somebody already within the gangway. The sauna door should always be specified as opening outwards for safety reasons because if the user starts to feel faint, they can simply push on the back of the door to egress the sauna rather than collapse behind the door, trap themselves inside, and prevent any rescue. Windows are a game changer in terms of sauna aesthetic, but often little consideration is given to the impact that these have on the computational volume of a sauna and in turn the power of the sauna heater required.
Check out our Windows and Doors Here!
Step 8: Choose Suitable Cladding and Bench Design
Cladding and bench design are critical components of sauna design. The cladding is secured with stainless steel brad nails and left natural. The wall buildup includes fire board, insulation, thermo-treated batten, and cladding. Cladding will nail directly to studs or Benching options include standard, L-shape, U-shape, and custom body form lounges. Lower bench-only saunas are not recommended due to temperature stratification. The focus should be on maximizing the upper bench space.
Checklist for Designers and Architects - Complete Sauna Kits can be Found Here!
- Consider building regulations
- Consider interface areas
- Choose suitable electrical supply
- Consider thermostat and control units placement
- Choose suitable ventilation setup
- Choose suitable flooring and drainage system
- Specify suitable windows and doors
- Choose suitable cladding and bench design
- Focus on maximizing the upper bench space
Conclusion
Specifying a sauna as an architect or designer can be a complex process, but by following this step-by-step guide and checklist, you can ensure that your sauna meets all the necessary requirements for a safe, durable, and enjoyable experience. Whether you're designing a small domestic sauna or a large commercial installation, careful consideration of the factors outlined in this post will help you create a sauna that meets your client's needs and exceeds their expectations.