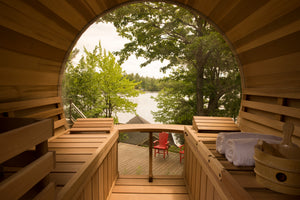

If you're looking for a relaxing and invigorating experience, building a sauna in your backyard might be the perfect addition to your home. Saunas offer a variety of health benefits, including improved circulation, stress relief, and detoxification. A sauna built from Canadian Timber Georgian Cabin Sauna offers a unique and stylish addition to your backyard. The luxurious design of the Canadian Timber Georgian Cabin Sauna is a perfect blend of traditional and modern styles. The cabin sauna is made from high-quality, durable materials that are designed to withstand harsh weather conditions, making it an ideal choice for your backyard retreat.
Getting Started
Before you begin construction, you'll need to make sure you have the following items:
- Sturdy and level platform to build your sauna on
- Starter stave
- Base staves
- Floor staves
- Wall and door staves
- Windows
- Fascia and trim pieces
- Shingles and ridge caps
- Bench legs and seats
- Stove and chimney
Need to purchase a Georgian? Select your's today! Here
Check out our video!
Step-by-Step Instructions
1. Prepare the Platform
The first step in building a Canadian Timber Georgian Cabin Sauna is to prepare the platform. Ensure that the platform you've chosen is level and sturdy. A level foundation is essential for the stability of your sauna. Place the starter stave at the front of the sauna, and place base staves on each side, securing them to the starter stave with three 3-inch screws into each end of the base stave. Continue placing base staves, aligning them with the marks on the starter stave, and securing them to the starter stave with three 3-inch screws into each end of the base stave.
2. Install the Floor
After you've prepared the platform, the next step is to install the floor. Place the floor starter stave and secure it with twelve 3-inch screws, six on the inside and six on the outside. Place the next floor stave, ensuring the tongue is tight into the groove, and secure it with six 3-inch screws. Continue placing and securing the floor staves until you reach the end, using the smaller floor stave and securing it with six 3-inch screws.
3. Assemble the Walls and Doors
Once the floor is in place, you can move on to assembling the walls and doors. To assemble the walls and doors, start by placing the stave labeled door onto the front of the sauna. Place a sidewall stave and use the provided hit block to tap it into the notch on the door stave. Place the back wall starter stave, securing it with three 3-inch screws into each base stave. Tap the sidewall stave into the back wall stave notch. Place a sidewall stave on the opposite side and tap it into the notch on the front and back stave.
4. Install Windows and Additional Layers of Staves
After the walls and doors have been assembled, the next step is to install windows and additional layers of staves. Place five-inch screws into the notch on each base stave. Place three-inch screws through the door stave into the floor stave. Place four 3-inch screws through the sidewall stave into the floor staves. If the back wall stave isn't sitting flush, insert a 5-inch screw through the top to pull it down tight. Place three 3-inch screws through the back wall stave into the floor stave. Place four 3-inch screws through the other sidewall stave into the floor staves. Place the stave labeled Change Room Door next to the notches in the middle of the side staves.
What should it look like? the Georgian Cabin Sauna, click and drag to look around!
Continue placing and securing layers of back, side, and tiny frontwall staves until the tiny frontwall staves are 8 layers high. Place your windows next to the tiny frontwall staves, and slide all the tiny staves without a notch between the doors and windows.
5. Install Roof, Fascia, and Trim Pieces
After the walls and windows are in place, you can move on to installing the roof, fascia, and trim pieces. To install the roof, begin by placing the roof starter piece and securing it with six 3-inch screws into the triangle pieces. Place eight additional 3-inch screws across the roof starter piece into the wall stave. Begin placing the roof staves, ensuring the tongue is tight into the groove and securing them with three 3-inch screws. When you reach the peak, use the roof finisher piece and secure it with three 3-inch screws into the triangle pieces and eight 3-inch screws into the center beam.
Attach fascia and trim pieces, including the front and back fascia pieces and the side trim pieces, securing them with the provided screws.
6. Build the Benches
Once the structure is complete, you can move on to building the benches. To build the benches, start by placing the bench legs on the back of the sidewall of the sauna and marking the tops. Repeat on the other sidewall. Place four of the bench support staves on the marks and secure each with three 2-inch screws. Bring in the first bench seat and place it on the top supports. Secure it to the supports with four 1-inch screws.
Place a bench leg under the bench and align it with the crossbeam on the bench, ensuring it is centered and secure with four 2-inch screws. Repeat the process with the second bench leg. Bring in the next bench seat and place it on the bench legs. Secure it to the legs and supports with eight 1-inch screws.
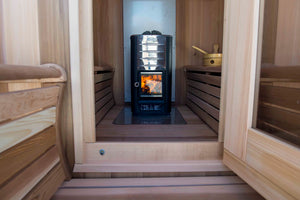
7. Install the Stove and Chimney
The final step in building a Canadian Timber Georgian Cabin Sauna is to install the stove and chimney. Prepare the stove and chimney for installation by removing the chimney plate from the back of the stove and making sure the grill inside the stove is sitting in the groove and not turned sideways. Place the handle on the stove door and secure it with the two provided screws. Remove the plastic from the heat shields and chimney pieces.
Measure and mark the location for the chimney hole. Cut out the chimney hole using a jigsaw. Install heat shields and secure them to the wall. Assemble and install the chimney stack, securing it with the provided bolts, washers, and nuts. Place the chimney hole covers and secure them with the provided screws.
Tips for Building a Canadian Timber Georgian Cabin Sauna
- Make sure the platform you've chosen is level and sturdy before beginning construction. This will ensure the stability of your sauna.
- Take your time when assembling the walls and doors to ensure that they are secure and level.
- Use the provided materials and follow the step-by-step instructions carefully to ensure the best results.
- When building the benches, make sure they are sturdy and secure.
- Follow all safety precautions when working with wood and power tools.
Conclusion
Building a Canadian Timber Georgian Cabin Sauna with a change room and wood stove is a rewarding and enjoyable project that offers a host of benefits. By following these step-by-step instructions and tips, you can create a beautiful and functional sauna that will provide you with years of relaxation and rejuvenation. Remember to take your time and follow all safety precautions when working with wood and power tools. With a little patience and effort, you can enjoy the benefits of your very own sauna in the comfort of your backyard.