Building a sauna room at home can be an exciting project that takes your relaxation game to the next level. On average, it takes about one to three days to build a sauna. The time you need depends on factors like whether you have a pre-made kit or are constructing it from scratch.
If you decide to go with a pre-made sauna kit, the process is usually faster. Most pre-made kits come with detailed instructions, and all the necessary parts, making assembly straightforward. You might be able to finish the project within a day or two with some basic DIY skills.
For those opting to build a sauna from scratch, the timeframe can increase. Custom-built saunas require more planning, materials, and construction work. You might be looking at a timeframe of up to a week if you include sourcing materials and prepping the space.
This guide walks you through each step, from selecting a location and materials to electrical setup and final touches.
Here's what you'll find in this guide:
-
How to choose the best location for your sauna room
-
Designing your custom sauna room: plans, materials, and features
-
Step-by-step sauna installation: framing, insulation, and heating
-
Installing the heater and benches in your sauna room
-
How to ensure safety and efficiency in sauna installation
-
Final steps and maintenance tips for your sauna room
If you're considering adding a sauna to your home, you'll learn exactly what to expect and how to do it right.
How to choose the best location for your sauna room
Choosing the best location for your sauna is essential for both convenience and efficiency. You can choose between indoor vs outdoor options, consider the size you need, and ensure proper ventilation and safety.
Pros and cons of indoor vs. outdoor sauna installation
An indoor sauna fits well in homes with extra space in a basement, bathroom, or spare room. It provides consistent temperature and is easier to access during winter. Indoor saunas are less exposed to weather, so they last longer with less maintenance.
An outdoor sauna can be placed in your backyard, garage, or near a pool. These saunas offer more space and can blend into the landscape. Outdoor saunas typically need more maintenance due to weather exposure but offer a more natural experience.
What size sauna room do you need?
Choosing the right sauna room size starts with evaluating both your available space and your usage needs. A well-sized sauna balances comfort, efficiency, and cost, whether you’re building indoors or outdoors.
Most residential saunas range from 4x4 ft (for 1–2 people) to 8x12 ft (for up to 8–10 people). Beyond basic dimensions, you also need to account for heater clearance, ventilation space, and user preferences.
Step-by-step: How to determine the right sauna size
-
1. Measure your available space:
Identify the exact location (indoor or outdoor) and use a measuring tape to determine the width, depth, and ceiling height. -
2. Decide how many users it must accommodate:
A 4x6 ft sauna fits 2–3 people comfortably, while a 6x8 ft model can seat 4–6 users. -
3. Factor in the heater footprint:
Most heaters require 1–2 feet of clearance around them. Don’t count this area as usable bench space. -
4. Plan for ventilation and airflow:
Allocate space near the floor and ceiling for vents. In tight spaces, you may need to modify panel placement to accommodate airflow. -
5. Account for future use:
Will you use the sauna solo, or host guests regularly? If your usage may grow, consider sizing up slightly. -
6. Consider power and material needs:
Larger saunas require higher wattage heaters and more insulation, which increases both upfront and ongoing energy costs.
Choosing a sauna that’s too small may lead to cramped sessions, while going too big can waste energy and exceed your installation budget. Getting the size right ensures maximum comfort and performance.
Understanding ventilation and safety considerations
Proper ventilation is critical for both the performance and longevity of a sauna room. Without controlled airflow, heat and humidity can accumulate unevenly, leading to discomfort, reduced heater efficiency, and long-term structural issues like mold or wood degradation.
According to the 2021 International Residential Code (IRC), sauna rooms must include a ventilation opening of at least 4 × 8 inches, located near the top of the door, this ensures adequate airflow and supports safe continued operation.
To achieve this, install one vent near the floor (intake) and another near the ceiling (exhaust). These should connect to outside air whenever possible, especially in indoor saunas. Ensure that vents are not obstructed by insulation, framing, or equipment.
Safety is equally important and goes beyond fire prevention. Saunas involve high temperatures, electrical wiring, and moisture—creating a unique combination of risks. The U.S. Consumer Product Safety Commission (CPSC) advises the following:
-
Maintain safe clearances between the heater and combustible materials (per manufacturer instructions).
-
Use only heat-rated electrical wiring and components.
-
Avoid installing saunas near water fixtures like showers or sinks to reduce electrocution risk.
-
Ensure GFCI (Ground Fault Circuit Interrupter) protection on all indoor sauna circuits.
-
Install a fire extinguisher nearby and post clear usage guidelines if the sauna is accessible to guests or minors.
Following local building codes and consulting a licensed electrician or contractor is not optional, it’s essential. These steps not only ensure compliance but also protect everyone using the space.
Do you need a permit to build a sauna at home?
Before starting your sauna installation, it's essential to check local building codes and permit requirements. Depending on your location and sauna type, you may need official approval to move forward legally and safely.
Most municipalities in the U.S. require permits for any electrical work, especially for systems involving 220–240V circuits, which are common for electric sauna heaters. This applies to both indoor and outdoor sauna installations. If your sauna includes plumbing (such as a nearby shower or drain), additional permits may be required for water and sewage connections.
Outdoor saunas often fall under zoning regulations, especially if you’re building a standalone structure. Local codes may dictate how far the sauna must be placed from property lines, other buildings, or public utilities. Failing to follow these rules can result in fines or forced removal of the structure.
To avoid legal issues and ensure your sauna is safe, always consult your city’s building department before beginning. Hiring a licensed electrician or contractor can also help streamline the permitting process. Taking the time to confirm requirements up front can save time, money, and stress in the long run.
Accessibility considerations: If you plan to install multiple saunas, for instance, in shared or community settings, federal ADA guidelines mandate that at least 5% of the units (or at least one of each type) must be accessible, ensuring equitable design and compliance with legal standards
Designing your custom sauna room: plans, materials, and features
Designing a sauna involves careful planning to ensure it meets your needs. The key areas to focus on include choosing a sauna plan, selecting materials and wood, and customizing design elements.
To meet accessibility standards, especially in public or multi-user settings, consider including a turning space of at least 60 inches in diameter to comply with ADA design guidelines for sauna rooms.
How to choose the right sauna plan for your space
Start by deciding on the type of sauna that suits you best. Options include wood-burning, electric heaters, and evenpre-built sauna kits. Think about the size and shape of the sauna. Smaller saunas fit 1-2 people, while larger ones can hold 4-6 people.
Consider indoor or outdoor placement. Indoor saunas need proper ventilation but are more convenient for year-round use. Outdoor saunas offer more space and can be built in gardens or near pools.
Selecting materials and wood type
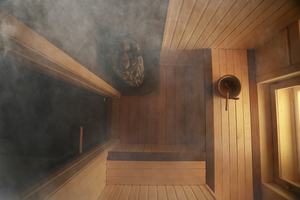
The material you choose affects the sauna's durability and comfort. Cedar is popular due to its resistance to rot and its pleasant aroma. Hemlock is another good choice; it's sturdy and doesn’t get too hot to touch.
Use thick wood panels for the walls to ensure proper insulation. Some sauna kits come with pre-cut panels for easy assembly. Also, select a sauna door with a window if you want natural light inside.
Personalizing your sauna room: benches, lighting, and layout
Customization allows you to add personal touches. Think about adding windows for light and views. Consider where to place the heater, as this impacts the sauna's heat distribution. Electric heaters are easier to control, while wood-burning heaters create a traditional feel.
You can also choose different types of benches – tiered benches offer various heat levels. Add hooks for towels and robes, and install appropriate lighting for ambiance. Keep in mind safety features, like proper wiring and ventilation, to ensure a comfortable sauna experience.
Step-by-step sauna installation: framing, insulation, and heating
Building a sauna involves several steps, including setting up the foundation, adding insulation, building walls and a ceiling, and installing the heater and benches.
How to build the foundation and frame for your sauna
Start by selecting a suitable location with a level surface. The foundation can be a concrete slab (ideal for outdoor or high-humidity areas) or a raised wood subfloor (common in basements and interior installs). In either case, ensure proper drainage beneath the structure to prevent long-term moisture damage.
Use pressure-treated 2x4 studs to build the frame, anchoring them securely to the foundation. Incorporate framing for door openings, vent cutouts, and any planned windows or lighting fixtures. For standard ceiling height, aim for 7 feet—this helps with heat retention and heater efficiency. Double-check that the structure is square and plumb before proceeding.
If installing a sauna indoors, verify that the framing is compatible with your existing floor joists and ceiling supports. For outdoor saunas, account for roof slope and runoff direction.
Insulation and moisture barriers
Thermal insulation is essential to retain heat and improve energy efficiency in a sauna room. Use R-13 fiberglass batts in the wall and ceiling cavities, ensuring a snug fit between studs. For ceilings in colder climates, consider R-19 insulation for extra heat retention.
Over the insulation, install a foil-backed aluminum vapor barrier, with the reflective side facing inward. This layer not only blocks moisture but also reflects radiant heat back into the room. Overlap seams by at least 2 inches and seal them with high-temperature aluminum tape.
Don’t skip this step, improper vapor sealing can lead to condensation behind panels, rot, and long-term structural damage. In outdoor installations, also consider using a secondary moisture membrane between exterior framing and cladding for added protection.
Erecting walls and installing the ceiling
With insulation and vapor barrier in place, you can begin paneling the interior. Use heat-resistant, knot-free softwoods such as western red cedar, hemlock, or Nordic spruce. These woods remain cool to the touch and resist warping under high heat and humidity.
Panels can be installed horizontally (for a traditional aesthetic) or vertically (to visually elongate the walls). Nail each board to the framing, avoiding overdriving fasteners, which can crack the wood. Use stainless steel or galvanized nails to prevent corrosion.
On the ceiling, follow the same material and orientation as the walls. Ensure tight seams around corners and light fixtures. Include a small access gap near vents or heaters, if specified by the manufacturer, to allow for air circulation. Once complete, the sauna shell should be fully enclosed, insulated, and ready for heater and bench installation.
Common sauna installation mistakes to avoid
Even experienced DIYers can make critical errors when building a sauna. Avoiding these common mistakes can improve safety, efficiency, and the overall performance of your sauna room.
One of the most frequent issues is insufficient ventilation. Poor airflow leads to heat retention problems and long-term moisture damage, increasing the risk of mold and wood deterioration. A properly installed ventilation system includes both low and high vents to maintain air exchange and protect structural integrity.
Another common mistake is choosing the wrong materials, such as wood that can’t withstand high temperatures or becomes too hot to touch. Always use heat-tolerant, non-toxic woods like cedar, hemlock, or spruce. Similarly, using standard nails or adhesives that can’t handle sauna heat may lead to early material failure.
Improper heater placement is also a critical error. The heater must be installed according to manufacturer specifications regarding clearance, power source, and air circulation. Skipping electrical code compliance or attempting amateur wiring can pose serious fire and safety risks. Hiring a professional when in doubt is a smart investment.
Installing the heater and benches in your sauna room
Choose between a wood-burning stove or an electric sauna heater. Install the heater according to the manufacturer's instructions. Make sure it is placed safely and securely.
Build and install benches using sturdy wood like cedar. Arrange them at multiple levels to allow for varying heat experiences. Secure the benches firmly to the frame to ensure safety.
Each of these steps is essential for building a functional and enjoyable sauna.
Sauna electrical and heating systems: what to know
The heater is the heart of your sauna room, and proper installation ensures not only performance, but also user safety. Whether you choose a wood-burning stove or an electric heater, follow the manufacturer’s clearance, mounting, and electrical specifications precisely.
Heaters should be placed on a non-combustible surface and never obstructed by benches or walls. Always verify compatibility between heater wattage and sauna room volume for optimal heat output.
For electric units, professional installation is recommended to meet local electrical codes. Wood-burning stoves require proper flue routing and air intake to maintain combustion efficiency and prevent smoke buildup.
Your sauna’s electrical and heating systems must work together to deliver consistent temperature, responsive controls, and long-term reliability. This includes:
-
Choosing a suitable heat source based on sauna size, indoor/outdoor location, and usage pattern
-
Ensuring the wiring and circuits meet local code requirements
-
Installing safeguards like GFCI protection, heat-rated wiring, and proper heater placement
Neglecting any of these factors can result in performance issues, high energy costs, or serious safety hazards.
If you're unfamiliar with electrical work, always hire a licensed electrician. Improper connections inside a high-moisture, high-heat environment can pose fire or shock risks.
Choosing the right heat source
There are three primary heat sources for sauna rooms:
-
Electric heaters: Most common in home saunas. Require 220–240V circuits and offer fast, controlled heating with integrated thermostats. Easy to maintain and compatible with compact sauna designs.
-
Wood-burning stoves: Ideal for off-grid or traditionalists. Provide a rich, authentic experience, but require flue ventilation and more user interaction. Typically used in outdoor sauna rooms.
-
Infrared heaters: Use radiant heat panels instead of warming the air. They heat the body directly and operate at lower ambient temperatures, offering a gentler experience. Generally easier to install, using standard household outlets.
When selecting your heater, consider room volume, power availability, ventilation access, and how often you’ll use the sauna. Oversizing or undersizing your heat source leads to inefficiency and user discomfort.
Electrical wiring and installation
Wiring a sauna is not a standard DIY task—it must meet strict electrical standards due to the combination of heat and moisture.
Electric sauna heaters typically require a dedicated 220–240V circuit, sized appropriately to the heater’s wattage (e.g., 6kW, 8kW, etc.). Circuits should be protected by GFCI breakers and installed using high-temperature-rated wiring, like THHN or silicone-insulated copper cable.
Wiring should be enclosed in metal conduit or heat-shielded cable trays, especially in areas near the heater. Light fixtures, switches, and any control panels must be rated for high-humidity environments.
If you’re installing a wood-burning sauna stove, electrical requirements may be minimal—typically for lighting or optional fans. However, chimney installation must follow clearance-to-combustible regulations and local fire code.
How to ensure safety and efficiency in sauna installation
Safety should be top of mind when installing electrical and heating systems in your sauna.
Use heat-resistant plumbing and electrical components. Install fire-proof barriers around wood-burning stoves and ensure proper ventilation.
To maintain efficiency, ensure your sauna heaters are suitable for the size of your sauna. Insulate the sauna room well to prevent heat loss. Check that all systems meet safety standards, and regularly maintain both the heater and electrical systems.
Keeping your sauna's electrical and heating systems well-maintained will ensure a safe, efficient, and enjoyable experience.
Final steps and maintenance tips for your sauna room
Adding the right finishing touches and ensuring proper maintenance are crucial for the longevity and enjoyment of your sauna. Sealing wood, installing accessories, and ongoing upkeep are key steps.
Sealing and treating wood surfaces
Wood used in sauna interiors, such as cedar, hemlock, or spruce, requires ongoing care to maintain its structural integrity and appearance under high heat and humidity. While most sauna-grade wood is naturally resistant to decay, proper sealing helps extend its life and reduce the risk of mold or bacterial growth.
Use a non-toxic, water-based wood sealant formulated for high-temperature environments. Avoid oil-based products, as they can off-gas when heated. Apply sealant lightly to high-touch areas like bench surfaces and backrests, following manufacturer instructions.
Inspect the wood regularly for discoloration, cracking, or warping. Sand any rough or splintered areas with fine-grit sandpaper. Annual reapplication of sealant and seasonal deep cleaning with a mild, pH-neutral solution will help preserve both aesthetics and hygiene.
Important: Never seal the entire sauna interior unless the product is specifically rated for sauna use, doing so can trap heat and moisture, compromising ventilation and performance.
Best accessories to enhance your sauna room experience
The right accessories can significantly improve both the comfort and safety of your sauna room. Start with functional essentials, such as:
-
Thermometers and hygrometers: Help you monitor internal temperature (typically 160–195°F) and humidity levels for ideal conditions.
-
Non-slip flooring or duckboard: Increases safety and airflow underfoot, especially in high-traffic areas.
-
Heat shields and thermometer guards: Prevent burns from accidental contact with hot surfaces.
For added comfort and ambiance, consider:
-
Backrests and ergonomic benches for improved posture during longer sessions.
-
LED lighting with sauna-rated housing to create a relaxing atmosphere.
-
Bluetooth or waterproof speakers rated for high humidity, if you enjoy music during your sauna experience.
Choose accessories made from heat-resistant materials, and avoid electronics not explicitly rated for sauna use.
How to maintain your sauna for long-term performance
Ongoing maintenance is key to protecting your sauna room investment and ensuring safe operation. After each use, wipe down interior surfaces with a damp cloth and a mild, non-abrasive cleaner to remove sweat and oil residue. Avoid using harsh chemicals, which can damage wood and affect air quality.
Ensure proper ventilation after each session by leaving the door open or turning on the vent fan (if installed). This helps dry the interior and prevents mold or mildew from forming.
At least once per season:
-
Inspect the heater and stones for cracking or uneven wear. Replace damaged stones to maintain proper airflow and efficiency.
-
Check electrical connections for corrosion or looseness.
-
Tighten any loose screws on benches, vents, or paneling.
-
Re-sand and spot-treat high-contact wood surfaces as needed.
By building light upkeep into your routine, you’ll preserve the sauna’s comfort, extend its usable life, and avoid more costly repairs down the line.
Conclusion
Installing a sauna room at home involves more than assembling panels and wiring a heater—it’s a process that blends technical planning with personal customization. From choosing the right location and ventilation to selecting materials and heat sources, each decision impacts performance, safety, and overall experience.
Whether you go with a pre-made kit or a custom build, careful planning and attention to detail will ensure long-term satisfaction. By understanding common pitfalls and code requirements, you’ll create a sauna that delivers both comfort and durability.
Ready to start your project?
Take a look at our Sauna Installation Manuals. Contact us at 888-655-3625 for a free consultation to help you choose the perfect sauna room for you and your family.